Refillable Ink and Refillable Cleaning Cartridges.
CLEANING CARTRIDGES.
Remove the rubber plugs from the vent holes on the top of the cartridge. This can be done by using tweezers or stabbing a needle into the plug at a 45* angle and prying the plugs out. Do not remove the fill plugs as these are only used to refill the cartridges.
Never refill a cartridge with any liquid in the vents as this will destroy the venting system in the cartridge.
Insert the syringe with the plastic tip into the bottom of the cartridge and pull back on the syringe plunger to get about a 1/2 a cc. of cleaning fluid into the syringe. Tip the syringe at about 5 degrees before pulling back on the plunger so that you will not suck on the check ball inside the cartridge. If you don’t angle enough you will not be able to pull down on the plunger, if you go to steep an angle you will displace the check ball and then the cartridge will leak all the ink out of that cell into the printer.
Hold down the cartridge replacement button and when the print head moves into position take out the ink cartridges and replace with the cleaning cartridges. You MUST use both cleaning cartridges or the printer will not recognize the one cartridge. Push the button again and let the print head return to the docking station. You MUST let the cartridges sit in the printer for at least 4 hours (better 8 hours) without doing anything with the printer. This will allow the cleaning fluid to gradually work its way down into the print head. Now that you have waited you can run 1 cleaning cycle and 1 nozzle check. Compare that with what you had before. More than likely you will already see improvement. Again wait about 4 hours before the next cleaning cycle and nozzle test. You should again see improvement or the nozzles are now all firing in which case you can remove the cartridges and put the ink cartridges back in. If the nozzles are still not firing then repeat the above steps for a total of 3 times. If after 3 times you see no improvement then its time to let the printer sit for one entire week. This will allow the cleaning fluid to soften the hardened ink deposits. We have had printers that customers have put on a shelf for 2 years and gained full recovery by being patient with this process. It will do you no good to do a series of cleaning cycles back to back. You will simply waste the cleaning fluid.
If you get an error message with the cleaning or ink cartridges then simply wipe the green micro chips down with Isopropyl Alcohol and a Q-tip or
paper towel. No Kleenex or TP. Both are coated with skin softeners and will only make matters worse.
Unplug the printer from the wall for 5 minutes to clear erroneous messages from the .
NOTE: The VENT PLUGS will always be the furthest away from the microchip.
FILLING AND PRIMING INSTRUCTIONS FOR INK CARTRIDGES.
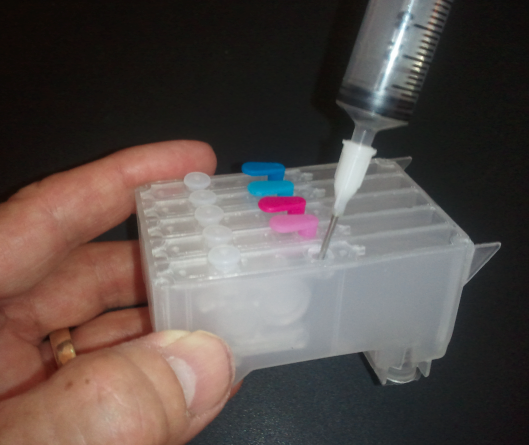
Remove the top cover of the cartridges. Remove the vent plugs and place the correct color ink into each cell. When all 5 cells are full push the top cover back onto the cartridge and replace the plugs back into their respective fill holes. Remove the vent plugs and prime the cartridges following the same instructions above in the cleaning cartridge section. Be sure to not have any plugs in the air vents and never put any liquids into the air
vents. Push the ink cartridge replacement button and install both sets of cartridges. Push the button again and the printer will prepare the cartridges for printing. Run 1 nozzle test to see that you get a perfect test. If the test is not perfect then you have introduced an air bubble into the print head. Simply let the printer sit for 2 hours so that the air bubble migrates back up into the cartridge. NEVER NEVER run a battery of cleaning cycles to get the ink to appear. This will only create major problems and will eventually air lock the print head ultimately destroying the print head. Remember air rises in a liquid and if you simply give the air bubble in the print head time to work its way into the cartridge the printer will start printing again.
We do not allow returns of any ink products due to possible contamination once the bottle has been opened. Installed or filled ink cartridges that are defective will be replaced, refunds are not permitted once the cartridges have been installed . Refillable ink cartridges and cleaning cartridges are warranted 90 days from purchase date from defects. The microchips on cartridges are not warranted against static shock or power surges in your home or office environment. We highly recommend a surge suppressor in your printer and computer power lines to minimize blown microchips on the cartridges.
Neither the seller nor the manufacturer shall be liable for any injury, direct or consequential, arising out of the use of, or inability to use, these products. You as the purchaser take full responsibility for the use of the purchased product.
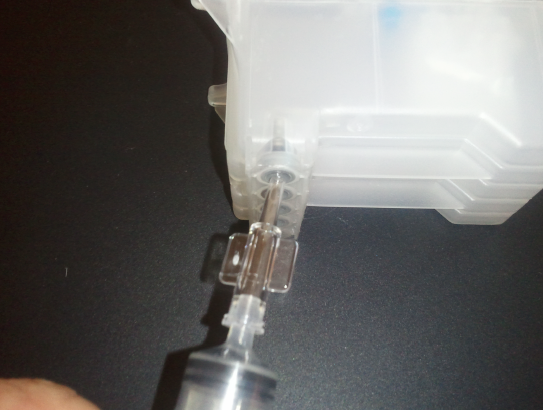
Five degree tilt on the syringe for priming.
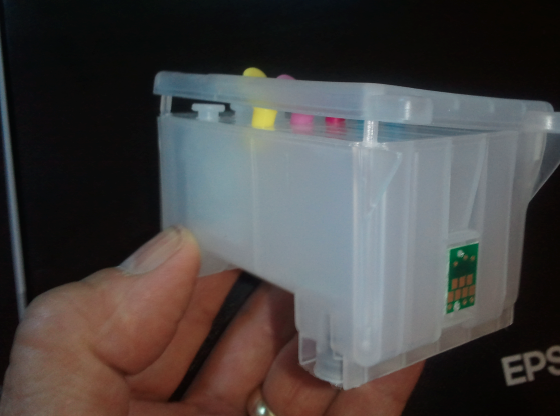
Remove the top cover of the cartridge.
Filling 1280 cartridge / sublimation ink.